Basement renovation!

Back in the summer Kyle and I searched high and low for a new house. While our current space works, there were a lot of things that we still wanted in a home that this one wasn’t giving us. We did find a house, but as luck would have it we lost out in the end and we were left in a “Well, now what?” situation.

So, we figured that we’d stick around here for a bit longer and make this house a bit more usable, mainly in the basement.

While our basement was a decent size, we barely spend any time down there. The exercise equipment was occupying our front den and the rec room was unused for the most part other than sending Isla down to watch a movie. There was also a storage room that we kept our extra dry goods in and some other junk, but really, it was a waste of space.

So, we decided that we’d take out that storage room, rip out the carpet, and create something a bit more welcoming and more enticing to use! A friend I play slo-pitch with just so happens to be a carpenter by trade and he was more than happy to help us out with the project for beer money his son’s college fund ;)

basement_progresscollage

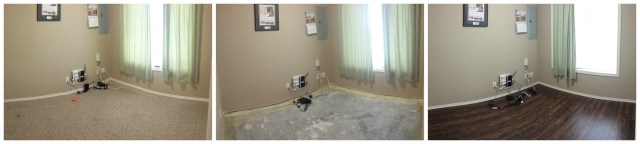
So there you can see what it looked like before and during the tear-out process! Isla had a grand ol’ time helping Kyle rip down the walls for the storage room.

basement_4

And there’s what it looked like after the studs came out and part of the flooring was laid. We had an electrician come in and  fix the wiring for the lights and the outlet that was on the outside wall, and a drywaller came in to remud the walls and texture the ceiling.

Kyle’s dad and his girlfriend were kind enough to come into town last weekend to help us repaint the walls, and on Monday while Norah napped and Isla watched an excessive amount of television, I repainted the trim. And now?

basement_6

basement_oppositeangle

Ta da! (Norah and Daphne clearly approve!)

The exercise equipment that was in the front den now lives happily in the space that housed all of Isla and Norah’s toys, their toys have been relocated to where the storage room was, and the couch and fireplace have been reconfigured and have a much more cozy feel!

Our front den also got new flooring to match the rec room:

office_collage

I’m thinking about making it into a guest space, but it’s too small to house a bed permanently. A futon and a little desk will work well, but we’re also toying with the idea of turfing the old suede couch and getting a full pullout sofa. I’m open to ideas!

Whatever I decide on for that little room, Kyle and I are so glad that we were able to get this project done! It took less than a month (working on it only on weekends) and it was way more affordable that we thought it was going to be!

This project has also shown me that renovations aren’t so bad afterall, and that maybe – just maybe – buying a bit of a fixer-upper in the future isn’t such a scary idea after all.

Getting Crafty

Kyle and I had always planned on eventually moving Isla to a different bedroom once she got older. While we were originally going to make the move when she was to become a big sister, but since we had new carpet installed and we were moving furniture around anyway, we went ahead and relocated her ahead of schedule.

I also originally has plans to repaint her room, but with the new carpet I really didn’t want to risk getting paint on it. Instead, Kyle and I decided to let her eventually pick her own paint scheme if she wanted something other than the brown that’s currently on the walls. To make her new room seem more like a little girl’s room and less like the guest bedroom is was, we’re brightening up her space with bright accents and furniture. (Eventually she’ll have white furniture to match the bookshelf I redid for her.)

Other than that bookshelf, I also decided to repurpose some letters that spelled out her name. Isla was gifted it when she first came to the world, but we never did hang it because there was no real spot to put it in her nursery. Instead, I found a decent sized canvas at Michaels for $13 (with one of their magical 50% off coupons), took the (giant) can of purple paint that I had bought to paint the stripes in her nursery (seen here), and painted it.

After the first coat.

After the first coat.

It was super hard to see the paint coverage in the sunlight and I ended up missing some spots, so a second coat was definitely needed. The colour is definitely one that pops when it’s in the correct lighting!

After the paint had dried, I busted out the glue gun and simply glued the letters onto the canvas! It definitely could have turned out better, but when you’re dealing with wonky, uneven letters and hot glue, you just gotta eyeball everything and hope that everything is more or less even ;) Overall, I’m satisfied with my craftiness.

20140810_202219

Please excuse the horrible lighting and wonky reflection. I swear, it looks better in person!

It really has helped brighten her room up, and Isla frequently points to it and says, “That’s Isla!” She also looks at it and attempts to recite the ABC’s, but whatever.

Upcycling Project: Bookshelf

Before Kyle and I even bought our own place, we had purchased a ridiculously heavy and old bookshelf from a company that was shutting down and purging all of its office supplies. It wasn’t exactly the most attractive  bookshelf, but it did the job in holding all of our random books, from my chick-lit novels to his welding books from school. We’ve dragged it around with us for nearly 5 years now and when we decided to put in new carpet and move Isla into her “big girl” room, I thought I’d take the opportunity to give it a little facelift.

Of course, I got started before taking “before” photos, but I did manage to find a couple of photos of it as background noise:

See? Brown and not very pretty. It’s a solid bookcase, but is wrapped in laminate, so it was going to make painting it a little tricky. Lucky for me, Kyle supported me in this project and he sanded down the finish with his palm sander. (Probably because he thought I’d sand my fingers off, or something like that, which is a huge possibility.) He also went out to the paint store and bought me the best primer and paint her could get his hands on. I had told him to get white paint and since he knows that there is no such thing as “just white” paint, he asked the lady at the paint store to help him with the right “shade.”

Anyway, the shelf ended up needing two coats of primer. Here’s a photo after I had the first coat all done:

Primed

After I was done priming it, it needed another two coats of paint:

I would have finished this a lot sooner if I was able to paint while Isla was awake, but since toddlers and latex paints doesn’t exactly go together, it took me about a week to finish everything between coats. (It also makes me very happy to have an enclosed garage where I can just shut the door when I’m done and not have to worry about the wind blowing dust all over the wet paint!)

When I was finally finished, Kyle and his uncle lugged the monster back upstairs and into Isla’s room. I’m really happy with the way it turned out and it really brightens up Isla’s room! Once she gets new furniture it will look great together. Here it is, all completed and loaded with Isla’s books and stuffies:

Done

I thought (briefly) about doing an ombre scheme on the back of the case, but since the shelves are adjustable I opted not to incase in the future Isla (or I) wants to change the height. And I’m sure Kyle would’ve groaned at that idea and the extra cost of paint anyway ;)

While I am proud of upcycling this bookshelf, I know that I probably could have bought Isla a whole new shelf for the same amount of money it cost for the paint & supplies. Womp womp. Live and learn, right? ;)